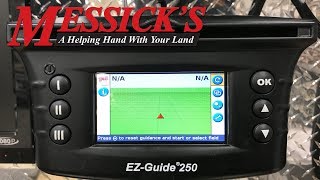
We're going to do a run with identical curve as our guidance line. You can see here, we're already set up with our tractor in the screen with our implement so far behind. Those are based off the measurements we already put in. Our eight points ready to be set. We could zoom out a little bit if we want to or in. That view right there is a pretty good one to run off of.
When I get to the spot where I'm simulating us putting the implement in the ground, I'm going to reach up here and hit the application button that will turn our paint on. You'll see the paint coming up the backside here. We're going to swing up here to the left and get things going. We are on a road, so we got to check for traffic. I'm going to reach here and push the paint and then also hit A.
It looks like we're going to compete with a chopper but we should be able to get here. It's telling us to drive at least 160 feet. That A is still on the screen. Now, we have a B because we reached that point. At this point, I'm going to hit, "Okay," because our B's highlighted. Going to turn off our paint and I'm going to turn around. You'll see the other guidance lines come back on to the screen here in a minute and we'll be able to go back down the other way and paint that other side of the road like it was a swath in a field.
Okay. At this point, all the guidance lines are down to the left of our line. We're going to pull over here to the other side of our original guidance line, turn our paint on. Now, you can actually see the LED's up here at the top. I'm a little bit too far, I need to get over to the right a little bit. See, I'm still over too far. There's our green LED saying we’re in the middle of our pass and we're painting the screen.
It says, "One L," because we are one pass to the left of our original pass. As we work farther to the right or left, depending which side of the line we're on, it will tell us where we're at, left to right of the line. We've come to the end of the field. I turn my paint off, swing back around. This particular field, we've run out of passes, but we can see here on the screen how the-- If you wanted to keep going left or right, you could easily just have more lines showing up, less lines showing up, and just keep painting the field to tell you where you've been.
That's the most important part of this, knowing where you're at, knowing where you're going, and knowing where you've been by painting the field. The other nice features of this is, in the top right corner you have speed, and then over here, tells you where you are from the line that you're driving. I'm talking, driving and doing all this at the same time. I'm a little bit off my line, but gives you a good bit of information. The other thing you can see there is the tractor on the screen is switching as it comes to the headland.
It knows where you stopped your guidance line, so it gives you an overhead view when you're turning around, like we're doing right now. Makes it easier to see your next line, especially when you have a small implement. Think we're at about 10 feet now. Gives you a nice view of implement behind you while you're turning over to your next line. Now, there, it's more of a horizonal view, switches to that red triangle. You can see down in front of you where you're headed on the screen as well as while you’re driving down the swath.