

Stump removal made easy - BaumaLight Stump Planer
Tags : bauma-light | skid-steer | stump | tree-removal |Stump removal made easy - BaumaLight Stump Planer
A stump planer is going to drill this stump much in the same way that a spade bit would in the end of your drill. This is an interesting attachment to me for a couple of reasons. When we look at things for our rental fleet, we're often looking for attachments that are going to help our customers have more value from their base unit. I'm not necessarily looking just to rent things and have the reoccurring revenue, but look for things that also add greater value to the attachments that you own, to the things that you would like to be able to use here and there, but can't justify yourself to own. And so I like this thing for that reason.
It is a cool way that you can take your existing skid loader, compact tractor, whatever, snap this thing on the end, and be able to go out and take care of a stump with a very reasonably priced and very flexible implement. A lot of the other things that we have to deal with stumps, be it a grinder with a wheel that goes in your three point hitch or dedicated machine or whatever, can be very, very costly. And this thing you're going to see here is surprisingly simple and surprisingly functional at the same time.
So this is a stump planer. Now what you see here is a skid steer mounting with a big housing here that has a hydraulic motor on the inside and a gear reduction set that gears down this shaft right here to spin slowly. There's also a set of ISO mount pads in here. If this thing gets jostled around a little bit, it has a little bit of give. It's not firmly mounted into this assembly. Attached to this drive right here is this bit. The bit has a screw here on the bottom in order to draw itself down into the stump, an initial set of cutting teeth right here that are going to grind the layers away. And then as you get higher up, a wide set of cutting teeth that are going to take the larger area and continue to grind it down to the ground.
Now, when I first got interested in this concept, I noticed that you can buy just these bits, and they're on the same size HEC shaft, as what's usually used for a post hole auger. And having a rental fleet full of post hole augers, I thought surely I should be able to just buy this and stick it on the end of my post hole auger, and be able to rent that out and go to town without the investment in all of this. This though, is quite different than a post hole auger. The gear reduction set that's in this runs at a much, much slower speed than what post augers do. I have a suspicion that if you went and you tried to drop this on the end of a traditional post hole auger, you would run out of torque very, very quickly and not be able to work very efficiently. So there is value in this whole setup that Baumalight is putting together here, beyond just the unique bit set up down here on the end that does the work.
And we're actually doing this in my backyard. I have taken care of about eight, nine stumps out here now. This one, though, I've got to approach a little bit differently. Most of the stumps that I've done out here, I've done by digging them out of the ground. You've seen this on some other videos, before we do a lot of work out here. And digging stumps usually is an issue. It's fun to come out in the backhoe, dig around the thing, be able to roll it out of the hill, and try to get rid of it. You do have to deal with it, unfortunately. I still have a really big one out here that despite several attempts and burning it hasn't gone away yet.
But the thing about this one is that the root system of the neighboring trees here, I'm a little concerned about. There's several big trees around this, several trees that if they died, they'd be a little too close to my house for comfort right now. Let's call it that way. So coming out here with a backhoe in order to get rid of this really isn't an option for me, so we're doing this with the planer today. Now the very first thing that we're going to do here is I'm going to take my chainsaw and cut this as low down to the ground as possible so that we have less wood in order to work away, so that's where we're starting here today. So you can see here with this cut off as crudely as I did this, my chainsaw's not nearly big enough to do this properly. We've got a really sizable stump left over. From end to end here across the deepest part of this thing is easily over three feet across. Baumalight recommends a technique here where you use the stump planer by starting around the outside edge of the stump and make circular cuts around the outside, working your way then towards the middle. As fun as it would be just to drop this thing into the middle of the stump and let it go to town, your work will be better if you work around the outside first, so that's what we're going to do.
Okay. So what we're going to do here is take this auger, and I'm going to move towards the front of the stump here. This is a Kubota SSV65. This is Kubota's smallest skid steer. This machine does have high flow, but I've found generally, I haven't needed high flow for this to work. This is going to be more about your hydraulic pressure than it is about flow. So we're going to come around to the side of the stump over here, find a place for that point to sit, and then rock my hydraulics on here to turn this clockwise. And what you're going to notice is that screw tip there on the front is going to start by digging itself down into the stump and pulling it down. I throw my boom in the float here, because I don't necessarily need a whole lot of down pressure. We're going to let the tool do the work.
There's been a time or two that I've wanted a little bit of pressure to push this down in the ground. But for the most part, the weight of the boom and the implement here seems to do a good job. And you notice here, as that starts getting down into the stump, the chips just start flying right off of there. It almost looks like cork coming off as the teeth are getting down into there and planing that stump off as it goes. Now, as you can see, once we get down further and further, that next set of teeth up higher will start to catch the stump and grind out a wider area. I have managed to stall this once in a while, when I get into that larger tooth. The radius now, the bit becomes a lot larger, and you don't have as much torque with that higher knife as you do with the low one. And I'm going to give myself a little bit of down pressure here. Let that continue to work. And now we're going to pull up here and find another place to start another hole. And again, we're just going to look for an area here off the side of the stump, where I can find solid wood and start running the bit right down into it.
And they also sell this as a splitter. There's a big screw, basically, you could put on the end here in order to split logs. And you can see a little bit of what I'm doing here will have the same effect. This corner here, you might not be able to see it on the video, has busted loose here as I go, as this thing gets down inside of it, so there we go. So it does end up kind of breaking the stump apart as you go. And I have used the bit here to go kind of pick through this a little bit and pull it apart. Now you don't want to go ramming into things with this bit. When you see people using post hole augers and stuff, if you put these things down into a solid pull, for example, and then try to drive the machine forward or back, you can bend your tool. And I would be careful with this in that way. It's not a case that you want to get this thing sunk down into the stump and then start backing up or something.
Now, my bit walked a little bit there as the stump started to break up. But again, we're working on the corners here. So taking kind of the places where the roots go down to the ground and walking away here. Once we start in the middle of the stuff, I think you would find this thing won't walk quite as much, but we're working the outside right now. And at first, when you first start making these holes, you're just waiting for the screw to pull itself down in. It doesn't start grinding right away at first. It takes probably 30 seconds before it gets down to the stump and the knives actually start to work and cut. But it is super gratifying just to watch that thing sit there and tear it apart. Another big plus of doing this in a machine like this, if you look around here on the ground a little bit, there's some ground bees flying around. I'm protected from any kind of bugs or bees. In fact, I got the air conditioning going in here today, which is pretty nice. Taking advantage of the machine with the cab. I've got into a rotten cavity there.
You can see as this starts to work its way down the stump, not only is it planing the top off, but the stump structurally starts coming apart. You can see the sides of this, where the roots be going down in will start to break up and pull away from the stump. And then just by digging around in here a little bit, chunks of wood naturally start to just kind of fall off this thing. So you're planing the top down, but you're also just kind of like breaking this thing up. Anything that's going to be left in the ground at this point, after this is done is easily going to rot. You're able to actually target some of those areas as you're working here with the thing. You got to remember is I keep equating this to an auger, because it's so similar to a post hole auger in its function. But there's significant construction differences here. So a post hole auger usually is going to have a swivel so that it hangs straight up and down, where this doesn't. This is fixed in place. So if you're looking at the stuff and trying to figure out the best way to attack it and get that auger down into it, it isn't always necessarily straight down. If I want to follow the stump down at an angle, kind of like I am here, I can point the tip down in a little bit and let the machine work and dig into it sideways and follow the stump down into the ground, not necessarily just point straight down into it, like you would with an auger.
This, I think, is really neat. When this gets down into a good, hard flat section of wood, and that knife is coming across and shaving the stump off, this is what you get, about a quarter inch thick shaving right off the top of the wood. And the neat thing about this is it's almost like cork, it's flexible. And the texture of it is just really interesting and cool. But you can see exactly what that knife is doing, taking a quarter inch off every time it goes around. So now I've gone around here, I've done a bunch of holes. And in order to be able to continue working, seeing what I'm doing, I need to remove the chips. So maybe here's one place that you could say could be a little bit of improvement with this thing, because this is either a two man job to sit and remove the chips so that the operator can see what they're doing. Or you need to pause periodically and get in here and rake the chips off the top of this stump. That bit isn't clearing the chips out of the way as you work.
This is my second time raking chips now, and this is kind of the wash, rinse, and repeat process that you do. Drill here a little bit, and then rake the chips away so you can see your work area. I didn't take my own advice very well here at the beginning. One thing that they'll tell you to do in the directions of this is to start on the outside of the stump and work your way around towards the center. This thing was really irregularly shaped, and I just stabbed at whatever looked good. And in some ways now, I could see the reason for going around and doing that.
Now that I'm ending up with these kind of thin areas between the holes that I've drilled, I get more spots here that rather than the bit going through and planing the areas off, chunks are breaking off instead. Once that tooth gets down to it, it breaks the piece off rather than carving it off, which it's still doing the job. It's still getting rid of the stump here at the end of the day, but I would probably end up with smaller chips here when I was finished if I let the bit do the cleaning. They're going to break down and rot away a lot faster that way, rather than this kind of stuff, these big chunks that come out here between the holes.
I don't know about you, but I think this is cool. I thought it was cool when I ordered it. And getting out here and running it the whole concept and idea behind it is that much more exciting and that much more viable to me. If you're a professional tree company or a landscaper that does tons of stump work, this may not be the best implement for you. There's certainly going to be things out there on the market that are tailor made to this kind of work, that are going to give you really nice finished results, maybe tear up your lawn a little bit less. However, if you're like me and none of that stuff matters to you. You want to get a job done on the cheap. You want an implement that goes on a machine that you already have, that's very fairly priced or can rent at a very fair asking price because it's not a massive investment, this is cool. Obviously, it's very capable of doing this work. I have a little bit more to do out here yet before I get kind of every little place that a root is sticking out here kind of ground down to the ground. But this is the third stump that I've done with this thing now. And it's been a nice, efficient way to do it. And I've been happy with the results. This is going to rot out here very quickly at this point and give me a nice finished product I think, so pretty cool.
More Articles
BaumaLight MP360 Mulcher
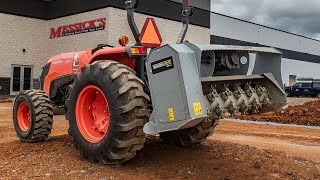
We're seeing more and more interest in the idea of a mulcher all the time. We sell many of them on the front of very large compact track loaders, like Kubota's big SVL97, where we're adding cooling packs on the back to deliver all of that hydraulic horsepower down to a very aggressive drum with big teeth. This though is constructed a little bit differently. Baumalight still refers to this as a mulcher, and it does a similar job, but there is some differences in its construction that are going to allow to work on the back of a small tractor. Where those big compact track loader mulchers generally have big aggressive teeth that are going to go and take chunks out of the wood. This uses these much smaller ones so that your little bit lower horsepower is applied over a smaller area, allowing this to go and work its well through and mulch that wood up.
In my experience of running it, it will mulch it goes through, and it pulverizes things. It does leave you a little bit bigger chip left over than what I'm used to seeing from those other machines. These are expensive attachments. The ones that go on compact track loaders are routinely more than $30,000. This is not a cheap attachment for a tractor as well, but it's nearly a third of the price of one of those. So little bit more expensive than going out and running a rotary cutter or a flail mower depending on what kind of work you have. But you're going to see when we run this thing, your ability to just run over just about anything you can find and chew it up is almost unparalleled.