


Kubota >
37150-31820

element not set
This part fits your tractor
This part fits 12 models
Installation Tips
(2 hours2 minutes)
Just replace wires one at a time
Just replace wires one at a time
4/24/2024
LEXINGTON, KY
John
LEXINGTON, KY
John
(30 minutes)
Use 7MM socket to replace each wire one at a time from bad switch to new switch for proper wire orientation. Just lift the front panel up after taking 4 bolts and washers tilting it from the bottom to access the ignition switch.
Use 7MM socket to replace each wire one at a time from bad switch to new switch for proper wire orientation. Just lift the front panel up after taking 4 bolts and washers tilting it from the bottom to access the ignition switch.
4/3/2024
Mooresville, NC
DUKE
Mooresville, NC
DUKE

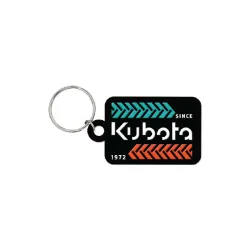
Kubota Black & White Keytag
Part# KT23A-A960
100+
in Stock
$1.95


Black Low-Profile Mesh Back Snapback Cap
Part# KT23A-H907
95
in Stock
$14.95

Kubota Two Tone Malibu Sunglasses
Part# KT22A-A820
11
in Stock
$5.95

12in Kubota Sticker Decal
Part# K2771-65122
72
in Stock
$3.99
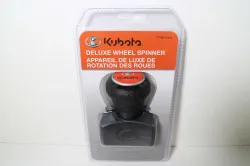
Deluxe Steering Wheel Spinner Knob for Tractors
Part# 77700-01540
100+
in Stock
$13.23

Kubota Stripe Camo Bill Cap
Part# 2004428940001
1
in Stock
$16.95

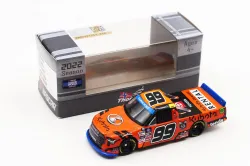
1:64 Ross Chastain 2024 Kubota Kansas Race Win ARC Diecast
Part# WX12465KUBRZW
29
in Stock
$12.99

Kubota Sunset Heritage Cap
Part# KT24A-H1092
10
in Stock
$17.95

Kubota 50th Anniversary Limited Edition Book
Part# CUKT22C-A852
30
in Stock
$49.95

1:64 Ross Chastain 2024 Kubota No. 1 Chevrolet Camaro Diecast
Part# CX12465KUBRZ
64
in Stock
$10.99

Kubota Men's Distressed Cap
Part# KT20A-H558
10
in Stock
$17.95
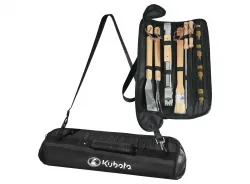
Kubota BBQ Grilling Tools Set
Part# KT21A-A569
4
in Stock
$29.95

Embossed Aluminum "Parking Only" Sign
Part# KB09-3344
39
in Stock
$18.95

Sandwich Visor Snapback Cap, Black
Part# 2004686550001
100+
in Stock
$15.95

Pro Chino/Mesh Cap
Part# 2002234850001
12
in Stock
$11.95

Navy Denim Cap with Tan Mesh Back (Low-Profile Unstructured Snapback)
Part# KT19A-H392
100+
in Stock
$17.95

Kubota Micro Mink Sherpa Blanket
Part# KT21E-A633
3
in Stock
$39.95

Charcoal Tire Tread Low-Profile Snapback Cap
Part# KT23A-H908
100+
in Stock
$17.95
Tire Tread Keytag
Part# KT23A-A958
100+
in Stock
$3.95
1:64 Ben Rhodes 2022 NASCAR Camping World Truck Series Diecast (Toyota Tundra)
Part# T992265KUBBR
51
in Stock
$7.99
Kubota Black & White Keytag
Part# KT23A-A960
100+
in Stock
$1.95
Black Low-Profile Mesh Back Snapback Cap
Part# KT23A-H907
95
in Stock
$14.95
Kubota Two Tone Malibu Sunglasses
Part# KT22A-A820
11
in Stock
$5.95
12in Kubota Sticker Decal
Part# K2771-65122
72
in Stock
$3.99
Deluxe Steering Wheel Spinner Knob for Tractors
Part# 77700-01540
100+
in Stock
$13.23
Kubota Stripe Camo Bill Cap
Part# 2004428940001
1
in Stock
$16.95
1:64 Ross Chastain 2024 Kubota Kansas Race Win ARC Diecast
Part# WX12465KUBRZW
29
in Stock
$12.99
Kubota Sunset Heritage Cap
Part# KT24A-H1092
10
in Stock
$17.95
Kubota 50th Anniversary Limited Edition Book
Part# CUKT22C-A852
30
in Stock
$49.95
1:64 Ross Chastain 2024 Kubota No. 1 Chevrolet Camaro Diecast
Part# CX12465KUBRZ
64
in Stock
$10.99
Kubota Men's Distressed Cap
Part# KT20A-H558
10
in Stock
$17.95
Kubota BBQ Grilling Tools Set
Part# KT21A-A569
4
in Stock
$29.95
Embossed Aluminum "Parking Only" Sign
Part# KB09-3344
39
in Stock
$18.95
Sandwich Visor Snapback Cap, Black
Part# 2004686550001
100+
in Stock
$15.95
Pro Chino/Mesh Cap
Part# 2002234850001
12
in Stock
$11.95
Navy Denim Cap with Tan Mesh Back (Low-Profile Unstructured Snapback)
Part# KT19A-H392
100+
in Stock
$17.95
Kubota Micro Mink Sherpa Blanket
Part# KT21E-A633
3
in Stock
$39.95
Charcoal Tire Tread Low-Profile Snapback Cap
Part# KT23A-H908
100+
in Stock
$17.95
Tire Tread Keytag
Part# KT23A-A958
100+
in Stock
$3.95
1:64 Ben Rhodes 2022 NASCAR Camping World Truck Series Diecast (Toyota Tundra)
Part# T992265KUBBR
51
in Stock
$7.99


1. Use a good pair of slip-joint pliers to remove the round nut (to prevent marring when installing, wrap with a rag) 2. Before you drop the old switch down from behind the dash, DISCONNECT THE VEHICLE BATTERY! (Removing ground cable is easiest) 3. Wipe off the barrel of the switch and write the wire colors (e.g. R for red, etc.) with a marker 4. Push the little "booties" back up onto the wire (or wires) off the screw connectors (this will be a pain on an older tractor very stiff). Try to not rip the booty - it provides short protection (underdash is very crowded with wires). Use carb cleaner SPARINGLY if the wire colors are not distinct (a wiring diagram from the shop manual helps immensely with this). 5. Unscrew the connectors for each of the wires on the switch. 6. Copy the color codes from the old switch to the new one. 7. Clean and/or sand the ring spades on the wire ends. 8. Remove the round nut, key slot gasket, and spacer ring from the new switch (the spacer ring goes on the outside of the dash panel when reinstalling) 9. Connect the new switch to the wires, matching the colors. 10. Push the annoying little booties over the connections. 11. Position the switch behind the dash panel. There is a small raised bump at the base of the threads that lines up with a small slot in the dash panel. (You'll know you're close if the hole in the switch body is facing downward - it's there to drain any moisture out of the switch). 12. While holding the switch in position, slide the spacer ring over the threads, then the key slot gasket - making sure the slot lines up with the slot in the switch cover (to be sure, slide the gasket onto your key, slip the key partway into the switch slot - the bump only goes in one position [up!]) 13. Thread the round nut onto the switch (be careful and patient - it's a very fine thread) 14. Making sure the key slot stays horizontal, tighten the round nut with pliers (add rag if cosmetics is important). 15. Reconnect the battery and enjoy!
Niles, MI
Mike