

New tractor owner ORIENTATION VIDEO
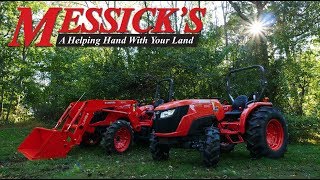
Tags : compact-tractor | compact-tractors | kubota | ownership | owning-a-tractor | tractors |Neil from Messick's here. Today we're outside with the Kubota Standard L Series tractor. I'm going to take a couple of minutes and go through a new owner introduction on this tractor. We've done a lot of videos on feature, function, benefit type stuff, and shown how machines work, but there is a particular process that we walk through in conversation that we have with everybody who's buying a tractor for the first time. I'm going to take a couple of minutes here and go around this tractor and show you all the controls, how to operate it.
If you're new to a piece of equipment, this would be a good overview and exactly how it operates. While this is a Standard L Series tractor, you're going to find these concepts translate into just about any machine that you would get on. Don't get hung up on the particular model number. Everything on every machine looks about the same. This should give you a good introductory overview of how to start running a compact tractor. Let's start through things. I usually do everything from the perspective of the operator. You're going to start with starting the tractor.
The first thing you want to do is put your rear end in the seat, put on your seatbelt, and make sure your ROPS is up. It's your standard configuration that you want your tractor in for safety. If you're working in a situation that you can't have this roll bar up, you don't want to wear your seatbelt. The idea being that if the tractor goes over, you need to be able to jump and get away from it because this roll bar being folded down will not prevent the tractor from rolling over. In order to start these machines that are going to be diesels. Diesels are going to have glowplugs and glowplugs work much like what a choke does if you think of it that way.
You're going to have a position here and your key switch that you turn your key a notch forward. Some tractors are going to have automatic timers for their glowplugs, some are going to have a manual place that you hold the glowplug on. Now, on a day like today where it is 90 degrees outside, you can see me up here sweating, there is absolutely no need for glowplugs. You don't need to heat the engine further but once you get down to say below 40 degrees or so, a little bit of time running those heating elements will start the engine easier.
Usually, you want to run those glow plugs in short bursts. Turn the glow plugs on for five or 10 seconds, try to crank the tractor, if it doesn't seem to want to go, go back and do five or 10 seconds again. You don't want to hold those glow plugs on for prolonged periods of time. They're heating elements and you can burn them out eventually. Using them in short bursts is going to make them last the longest. Once you have your tractor up and running, you're going to have a throttle. Your throttle most tractors is going to be up on the dash, either on the dash itself or on a lever on the side of the column.
Usually, you're going to set your throttle on a tractor like this for the task that you're doing. If you're going to say run a mower, either your mid-mount mowers or your rear mowers, you need high RPMs to get those blades spinning as fast as possible. Most tractors if you look at their tach, are going to have a little mark for where 540 is. That 540 mark is telling you the proper engine speed in order to run those attachments. If you're going to be doing things like loader or backhoe work though, you don't necessarily need all those revs, you just need your hydraulic power. You start to get your hydraulic power once you cross about 30% or 40% of your engine RPMs.
Once you get past that point, your pump is running efficiently and is generating most of your pressure. Now as you continue to run your RPMs up beyond that, you're going to generate more flow, which is going to make your loader and backhoe work more quickly but not necessarily with a whole lot more power. That's your engine RPMs. Now you're started, you got your throttle set, and you want to drive. Now talking through a hydrostatic tractor, most machines on your left-hand side are going to have a low, medium, high range selector, or in some smaller machines just a low and a high. I usually describe those as loader, mower, or highway.
For the most part in small tractors is usually about 0 to 4 or 0 to 8 or 0 to 12 miles an hour give or take depending on the model. You do want to think of that as a gear selector. When you're in those lower gears, you have more pushing power than you do in the higher gears. Another thing that you think of as a gear selector is your hydrostatic pedal. Once you've got your range selected, using your pedal down on the floor, you're going to press forward to go forward and back to go back. The harder you press that pedal down, also the higher gear you're in.
If you want a lot of push when you go into a pile of dirt, you want to push really gently on that pedal. That puts you in the low gear and enables you to push effectively into that pile. If you take the pedal and bury it to the floor, you're going to push your hydrostatic transmission into relief and it's actually not going to give you as much power as if you're just gentle on that pedal. That's driving, range selector, and pedal. The range selectors in all tractors are straight cut gears. They generally, if you're tugging on that lever and it doesn't want to go into place, what that means is that the teeth and the gear are bumping into each other.
If you just tap your hydrostat pedal, roll your tractor forward a little bit, those gear sets will rotate and then want to drop into place. They are not shift-on-the-go gears. You want to stop the tractor and pull the lever, don't change shift it while you're moving. Some tractors have clutches on the left-hand side, this one does. The need for clutches on most of these tractors and in hydrostatics, in particular, is really diminishing, many, many machines don't have them anymore. If you do have a clutch with a hydrostatic transmission, most of the time, you're just decluttering the engine in order to start it easier. You just push that clutch down when you start the engine up.
After that in a hydrostatic machine, you don't really use the clutch for most anything. Some machines are going to have mechanical PTOs where you clutch to engage the PTO and then you can let it out slowly to bring your PTOs up to speed. A lot of machines like this Standard L now are going to have electronic switches. They do have a little bit of hydraulic feathering for that PTO but will turn things on abruptly. If you have a PTO like that but you're not using a clutch to bring it up to speed, you always want to lower your engine RPMs first, turn your PTO for your attachment on, and then bring your engine RPMs up.
It's easier on all the gearing for your PTO and for your attachments not to have high shock loads thrown at them in that way. If you look down on the floor of your machine. You'll always have brakes. Some tractors are going to have their brakes on the left and some are going to have them on the right. It depends on how the pedal configuration is set up. Many tractors though will have split brakes, where you'll have to brake pedals. Most of the time, there's going to be a lever across the back of those brake pedals that engage both of them at the same time.
Now those two pedals are not front and back, they are left and right. The reason why they can be split is because some of our more advanced operators will use those brakes to do things like make tighter turns by breaking your inside tire or using it to transfer power to the left or the right side of the tractor if they happen to get stuck in the mud. It's pretty advanced feature. Many, many people will usually just engage the little latch across the back of the brake pedals and leave them there all the time.
If you're not familiar with what that is, you do always want to keep that engaged so that if you have an oh crap moment, you go up to smash on the brake pedals, that you don't just get one pedal only braking half of your tractor. You want to keep that little lever engaged so if you go up there, you give all the braking power that your tractor has. Working across our right-hand side now, we have our height control for our three-point hitch. This will take your three-point up and down. If you haven't been mount mower, those are tied to the same three-point hitch linkage, they will go up and down from there as well.
This tractor has what's called position control one through eight. Some other smaller tractors will have what's called a quarter inch valve which is just an up and down. One way or the other, the end result is your three-point hitch linkage is going to go up and down. If you have a mid-mount mower, a lot of the smaller tractors will have a height control dial down here between your legs, you can use that to set your height. If you don't have that dial and you're on a bigger tractor, odds are you have a ground contact mower deck where the height is set by gauge wheels on the mower deck itself instead of that dial. Down here between your legs is the most misunderstood control on a compact tractor.
It is a dial that changes the drop speed of your three-point hitch. When you're lowering this three-point up and down, it has hydraulic power coming up and it will lift with power, but going down, it's simply allowing gravity to drop that implement down to the ground. Implements don't have downforce on your three-point hitch on small tractors. You use this dial down here to change how quickly that three-point hitch is dropping. If you have a really heavy implement, it's going to drop much more quickly than if you have no implement at all or a very light one. You turn this dial left to right in order to change how quickly that drops.
Four-wheel drive controls, their locations can change depending on the model that we're sitting here on a Standard L down here between your legs. One way or the other, you'll see either an icon with an arrow over top of the front tires or some of them showing a little break between the front and the back of the tractor. That one with the brake is actually the more common one. It's an international tractor symbol that you'll see on a lot of machines and it makes very little sense. Two and four would make a lot more sense, but they instead use this icon with the funny break in the middle. That's either going to be down in between your legs or on some tractors on the fender on your left-hand side.
With all of these things, with your four-wheel drive control, your range selector, all of those controls that are related to movement are always going to have orange handles on them. Your throttle has an orange handle because changing it up or down is going to impact your movement. Your four-wheel drive is going to change the functional movement of your tires. The ring selector has an orange handle because it's going to change your speed. Those orange handles actually mean something and most tractor companies should be following an international standard that exists for color-coding of those levers.
Down on the heel of my left-hand foot, most machines are going to have a differential lock. The way a diff lock works in the rear of your tractor, it allows you to steer more effectively, it allows the tires to spin at different rates, but it does also only usually put power to one tire. If you get stuck in the mud and you're sitting there and one tire is still and the other tire is spinning, stepping on that differential is going to lock that slipping mechanism and force both of the tires to turn together. One thing you want to be conscious of when you step on a differential is that you don't step on it while the diff is spinning.
If your wheels are sitting there and moving and you step on the differential, what it's doing is it's sliding a pin into that rotating mechanism, and you don't want to slide that pin in while the gears are spinning. You're at the shear off the tip of the pin. When you step on a differential, you first want to stop the wheels from spinning, step down the diff lock with your heel, and then go back to your hydrostatic pedal and start driving forward again and that diff will catch.
Now, once that pin has slid into that rotating mechanism, if you take your foot off the differential it won't release right away. If there's tension sitting on that pin, you won't feel or hear a pop out right away. You're going to drive the tractor a little bit more until the differentials free up and that spring will then pop the pin out of the differential. Up on the dash of the tractor, we're going to have a couple of different things. Usually, one single assembly for things like turn signals headlights and four ways, most tractors do have four ways on them for your rear lights and your headlights.
If you have the orange triangle on the back of the tractor, you usually can drive down roadsides like a piece of farm machinery. You have all the safety equipment that you need in order to do that. Usually, on one single cluster for all those, some of the bigger utility tractors will have stalks up on the steering column like your car or truck would, but most tractors are going to have it on a small cluster. Any machine now over 26 horsepower is equipped with a diesel particulate filter.
This is an important conversation that it's often not had with people and it's often not understood well and is the reason why you'll hear problems with emission systems. Nine out of 10 times, it's because somebody doesn't understand how it works. A DPF is going to catch all the soot coming out of your engine. The hotter your engine is running the less soot it's producing. We discourage people from spending large amounts of time putting your engine around at low RPMs. These tractors and these engines work their best in a little bit higher engine RPM. Don't run it at idle, speed it up a little bit.
On a machine like this, somewhere between about 20 to 40 hours depending on that soot load, the tractor is going to go through a regen cycle. I've got a whole video dedicated to just this process if you want to go take a look at it, but in a nutshell, what you're watching for is light on your dash with a little poof. When you see that poof light come on, if you're already say mowing, the tractor is automatically going to go through what's called a regen cycle. You don't have to do anything at all, you just continue operating. You'll hear the tone of the engine change and maybe smell something a little bit, and it's going to take about 15 or 20 minutes to go through and burn off the soot that's inside of that capture device.
You have another light on there as well, it's going to see the poof with an up arrow. If you're showing the up arrow and it's sitting there blinking, it means your engine is running too slow in order to regen, so all you need to do is raise your engine RPMs up a little bit to create that extra heat that's needed to go through the burn cycle. There are two buttons on your dash that are related to this whole mechanical system. One of them has the poof with a slash through it. What that's doing is preventing your tractor from going through a regen cycle.
The normal application for that is one of two different things. If you're headed to the barn to go park your machine and it's going to start to go through regen and you don't want it to because you're going to go shut your tractor off, you hit that button and it won't do it. The other time would be too if you're in some combustible environment if you're using your tractor in order to say load hay in and out of a barn, you can push that button and it will make sure your engine doesn't go through regen. That was a little bit of a concern when these systems first came out because there was a lot of perception that a lot of additional heat was going to be created through the exhaust of the tractor.
If you actually go at the heat gauge and you check, the tractor is not really creating any more heat doing regen but what it does it wide-open throttle. Nonetheless, that button is there for safety's sake to make sure that you're not creating excess engine heat at a time that it could start a fire. The other button there on the dash is right beside the poof, and it has a little parked sign through it. That's for what's called a part regen. If you want your tractor in order to regen when you're not out operating it for some reason, you can simply put the parking brake on then raise the engine RPMs up and push that button and it will manually run the tractor through a regen process.
The time that you would usually want to do that would be going back to the barn, like we were talking before, if you're going to hop-off the machine, if you're going to leave it, the seat switch is going to shut off. If you go through everything, put the thing in a neutral range, park everything, hit parked regen, it will regen without you being around. If you also happen bypass the regen process too often and say you've gone and run 10 hours beyond when the tractor needed to regen, the parked regen process is a little bit more of a thorough deep clean than what the automatic regen process is, and so you can get the points where that's required and the tractor is going to want it.
You're going to see lights on the dash related to that, so easy process, park the machine, raise the engine RPMs, run the parked regen and all the things are going to go. 9 out of 10 times, you're just going to go run your tractor not worry about any of this, just run the thing a little bit higher engine RPMs when you see the little poof icon up on the dash, and you're good to go. 9 out of 10 problems that we see with emission systems would be prevented by simply knowing this information. Make sure every operator that gets on your machine is aware of this.
Often times the problems come from operators that just hop on a piece of machine and they've never had that education, a hired help or kids or somebody like that who's running the tractor that doesn't know to watch out for those things. A little bit of education goes a long way in preventing those problems. On the right-hand side of your tractor, you're going to have your loader stick. In the case of this Standard L, it's right here in front of me. A lot of other tractors now have them back here by your side. Regardless of where the lever is located, they're going to have the same function. Front and back is going to raise your load or up and down, left and right is going to curl your bucket back and forth.
If you look at the little chart that's up on your loader post, many tractors will have additional functions. Basically all of them will have a float feature where when you go forward, your loader is coming down under power. If you push far forward, you'll go over the top of a detent and you'll see that the loader stick there stays forward. That's called float. What float does is it opens up your lower loader cylinder and allows the loader cylinder to contort and follow say a driveway as it undulates up and down, or it can be used for back dragging as well. If you curl your bucket down, go into a float position and back up, it's going to allow your bucket to ride up and down as it spreads out material. It can be a really useful feature.
Some people, believe it or not, don't end up realizing that's there because they take their stick forward and their loader starts to come down and they think they've got it, but by going another step forward there's actually another function up there. One of our more deluxe tractors also have a speed dump feature. It's essentially the same thing but in the dump circuit of the tractor. If you go to the right-hand side, you'll curl the bucket down under power. If you go way over, you'll feel that you go over top of a little bump. It doesn't have a detent like float does but you can usually feel it.
When you go over the top of that bump, you'll go into speed dump and basically that's going to take your loader circuit and just open up that bucket and allow it to flop over very very quickly, allowing gravity and the weight of the load in your bucket in order to curl it down more quickly. Say if you're loading a truck, it's a much more quick way to unload your bucket versus having to wait for the bucket to curl down under power. Forward for float, the whole way right for speed dump. Our Kubota loaders also do a fantastic job of doing all these functions simultaneously.
When you pull that into the corner positions, you can do things like raising your bucket up and keep your bucket level, your load level at the same time. Practice those things and find those sweet spots in the corners where you can do multiple things at the same time. That's a basic talk through on the normal controls that you're going to find on just about any tractor. Now I've done over 200 videos on other tractors and equipment, and a lot of machines are going to have a little bit more of a deep-dive than this that might go through and say explain how to take implements on and off or to use a tractor in a particular application.
There's a lot that you can gain through experience of actually sitting in the seat and running the machine. This should be enough information to get you to that point that you can actually go out and start working. Check out our other videos or subscribe to our channel if you're just getting into the beginnings of compact tractors and equipment. I think you can learn a lot here. If you have any parts needs for machines you already got, service that could be done on your equipment or you're looking to buy a new piece, give us a call at Messick's. We're available at 800-222-3373 or online at messicks.com
More Articles
Kubota MX Series VS. Kubota M Series
We are working through a series of comparative videos between Kubota's different series tractors. We're up here in the upper end now between an MX and an M Series machine. This is one of the first places in this comparison series that you're going to start to see some very, very clear differences for a very, very different customer. Let's take a quick walk around these two tractors here and we could show you what makes an MX right for one person and an M series right for another.
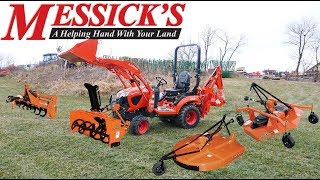
5 Most Common Compact Tractor Attachments
I'm here today do a quick explanation for you today of the top five implements that are typically sold with the compact tractor. Tractors themselves are after all tool carriers and most or every tractor is sold with at least two or more implements. We're going to show you some of the most common ones that are typically sold with new machines.
Understanding Three Point Hitch Classes
As you work through a tractor spec sheet you're going to notice a section on there that's going to have the category of the three-point hitch of a tractor. What that category is telling you is the size implements that are really made for the back of that machine.