

Kubota 50 Hour Maintenance on LX3310
Tags : 50-hour-maintenance | air-filter | fluid-basics | kubota-landing | machine-maintenance | oil-filters |Kubota 50 Hour Maintenance on LX3310
Neil from Messick's here to do a little bit of tractor maintenance with you here today. This is my Kubota LX 3310. It's not just a pretty tractor for YouTube videos, I actually do a lot of work at home with it. I'm rounding about 50 hours, 50 hours is a meaningful service interval for your equipment. It is the break in interval, and you're going to go through and drop fluids from your engine and transmission at this point, spin some new filters on there in order to get out all of that initial break in stuff that happens when a machine is new. When those gears first start turning, there's a lot of wear that happens there initially. It's probably the most important service interval that you're going to do. So today we're going to do it on my tractor here, go around and check a couple of different service points and change some fluids. Now before we get started, this should not be the first time that you're servicing your tractor. If you have a loader or a mower deck about every 10 hours you should be hitting those things with a grease gun, going around greasing all the moving points on your loaders and your mower decks. That is one of the primary things that we will look at when we see where on a machine.
Air Filters
You should also periodically be checking your air filter. You notice mine is perfectly clean. I don't tend to work... I say it's perfectly clean, dirtier than I thought it was. I don't tend to work in super dusty conditions so things like my air filters tend to stay pretty clean, but you should be pulling these things out and checking them periodically. These air filters are okay to take low pressure air and kind of dust some of the air out because there's a safety filter here on the inside.
If you get a small tear or something in here, that safety filter is going to catch that debris. If you look at your safety filter and you notice that there's dirt on that, this certainly should be replaced at that point and the safety filter itself also should be replaced as well because dirt and debris has made it through here and started clogging up that safety filter. You want to keep in mind that you've got two filters at a total of probably $45 or $50 cost that protected that several thousand dollars engine, so swapping these guys out periodically is only a good idea.
Fluids and Filters
So I stopped in at our dealership parts counter and picked up the things that I needed to do this service here today. Enough engine oil to change all of the oil in the engine, some transmission fluid to top off the transmission. I'm not going to change all the oil in this. I'm really just changing the filter, but I'm going to lose some oil when I do this. So I picked out some transmission fluid in order to be able to top that off. And then three filters. One is the engine oil filter. One's a hydraulic filter and one's a hydrostatic filter for the transmission. So you have two filters in the rear and one up on the engine. Now your drain on your engine is going to be different on every tractor but most of the time when you have a four wheel drive machine, you'll find it. The four wheel drive shaft splits right through the bottom of the oil pan and you'll have two drain plugs, one on the left side and one on the right side. If you've not been running your tractor, it's best to start it for 30 seconds and let that oil heat a little bit before starting to drain it out.
Finding your engine oil filter can be a bit of a hunt sometimes. When these machines are manufactured, that engine oil filter is spun onto the engine and then the engine is painted. So it's going to be painted the same gray color as what your engine is. Now in order to get to most of them, you're usually going to have to remove a side panel. This is just held on with a little hair pin here and sits over top of a couple of clips. With that off, you can easily see the engine oil filter, sits right here on the side. So there's the engine oil filter. We're going to save this and set it aside and on a follow up video here, we're going to cut this open and see how dirty this got in 50 hours. So check the channel out. Subscribe if you want to see that, then we'll spin the clean one on.
Now when reattaching these filters, you want to take a small amount of oil and put it onto the O-ring on the filter and then screw it onto the filter base by hand. Once it's tight, take the filter wrench and give it about three quarters of an additional turn. You do not want to crank the day lights out of these filters, they just need to be snug. Included in my handy Kubota oil change supplies kit is this little funnel. The funnel like this is almost necessary to have when you're changing the oil in a tractor. The fill ports are usually buried back inside the engine far enough that you just can't get your container up to it in order to fill. So I'll tuck this back in here and then start filling in through that funnel.
Now we've pointed out before you want to watch, if you have foil seals or debris or anything here, that you're not dumping any kind of foreign matter down into your engine. Make sure it's just good clean oil making its way down inside of there. Once you've filled it back up, you want to pull your dipstick, clean it off, stick it back in and check your oil level. Now once you've checked that you're comfortable with the amount that you have in there, I'd encourage you to start the engine up. Give it a couple rotations to get things mixed around in there, get all the oil flowing and then check your engine oil level again to see where it's settled out.
Now, most of you are going to have a hydrostatic transmission on your tractor and you will have two filters down here. One is the tractor's hydrostatic filter and one is the tractor's hydraulic filter. On most machines you're going to have one filter on the left side and one filter on the right side of the tractor. It's pretty easy to climb down there and find them, they usually stick out. But again, when you're doing this for the very first time, you're going to notice that the color of these filters matches the color of the transmission because they're put on and painted during the production process.
Today for our 50 hour service, we don't actually change the fluid that's in the rear end. Now you will hear advice given to sometimes change this fluid out. Even we will give that advice out sometimes. When you look at the fluid that's in here, it's going to pick up debris and that kind of stuff and it's not bad in order to drain it out and in the case of what I'm going to do today is following the operator's manual, which tells you that it's okay to leave this fluid in here longer. I'm just going to change the filters.
If you're going to drain it out, you're usually going to find your drain plugs on the lowest part of the tractor. In the case here my tractor has two, one on the left and one on the right side of the draw bar. Now, since we're only changing the filters, there is a trick that sometimes you'll see used. When you loosen that filter, you're going to start losing fluid. It's going to run out of the bottom side of the transmission. Sometimes you'll see people take a ShopVac and go to the fill port here at the top of the transmission and put a running ShopVac over top of it in order to draw a vacuum on that fluid and have it not run out as quickly. You won't see that would be something that our shop technicians do. If you are quick enough at removing and reattaching these filters, and you're ready to go, you'll only lose a small amount of fluid.
All right, now we're going to fill our transmission fluid here at the fill in the back. I'm using Super UDT2 for this. This is a synthetic transmission fluid that we're going to recommend you use an all Kubota tractors. There are definite performance differences in hydraulic fluids. Don't make the mistake of thinking that any one of these is the same as the next. We do see mechanical issues from the wrong fluids being used so we're always going to recommend using the OEM fluids.
We do it ourselves in our shop and given the choice, Kubota does have a UDT it's Super UDT fluid. In colder climates like ours here or in hydrostatic tractors, you're always going to want to use UDT2 which is maybe about 20% more expensive. The regular UDT is a cheaper oil and is okay in gear drive tractors or older machines. We're just going to keep going through and topping that off, periodically checking our dipstick here to get an idea of what our level is until we hit the right spot. On the topic of using OEM fluids, you'll notice that I'm also putting on OEM filters. Yes, I sell them but if you want to see some interesting stuff, go and check out some of our other videos where we cut apart popular Napa and AutoZone filters to go through and show the construction differences between an OEM filter and an aftermarket. These might be literally $2 more than what aftermarket automotive filters are. In some cases they're the same price, in some cases they're cheaper.
You're not being gouged by buying OEM parts. These companies are aware that these are commodity items that are priced out. Don't make the assumption that OEM parts are more expensive. In many cases, they're not and especially with filters, if you're paying a lower price, check out those other videos where we've cut filters apart. Oftentimes you're getting what you pay for. We like OEM. We like what's going on the tractor. You know you're getting quality. If there's a warranty issue, you know who's filters are on your machine. But at the very least don't go out and buy $5 engine oil filters for your expensive piece of equipment, buy good quality filters for your good quality tractor. Now changing the fluids like we just did here is what most people think of when they think of doing a 50 hour service on a tractor. But this is the point that I'm going to encourage you to get your owners manual out. As neglected and overlooked as the owner's manual often is they're actually really good when it comes to doing this kind of stuff. They'll point out all the drain plug locations and tell you everything to do, but it's also going to point out some additional stuff here that's often done at 50 hours.
Now those are going to be check and adjust type things like going through and checking your parking brake linkage or making sure that your fan belt is the right tension. Not a change, not a parts item like what I'm doing here, but check and adjust type items. If you go into that next interval and you start looking up at what is done at 100 and 200 hours, you're going to find more things and oftentimes when we're doing service at a dealership type setting, we're going to go through and recommend that you might go ahead and do some of those 100 hour things at the 50 hour interval while there's hands on your tractor.
These aren't expensive filters, but there's going to be times that you're going to want to go through and look at your fuel filters, see if they need to be changed. It might be worth swapping one of those out, they're only a couple of bucks. And looking around those other places on your tractor that you just might want to keep after some of that preventative maintenance type items. The air filter, for example. When I blew mine out there, you see how the dust came out? Those things can last 1000 hours in some equipment. They've got some really long intervals, but your conditions might dictate that something like that is worth swapping out. So make sure you're not just looking at the 50 hour but maybe going beyond and seeing if there's other incremental things that might be worth doing on your tractor.
So that's my own 50 hour service on my tractor. I am not a service technician. When I pick up wrenches, I make an embarrassment of myself more often than I look competent. Let's say that. My experience with tractors and equipment is so much more from the seat. I've got a service department that backs me up on a lot of this kind of stuff. So this is something that you can do on your own if you like. However, we've got departments full of people who are much better at this stuff than I ever will be and are more than happy to come out, help you through these things, do them at your home, give you a quick service. If you bring them into the store, this is the kind of stuff that we do. We're also available for any parts needs that you might have. If you're going to do this service yourself, check out messicks.com. We've made it really easy for you to select your model of tractor and see everything that you need.
Give us a call 800-222- 3373
Parts Hotline: 877-260-3528
Kubota Parts - http://www.messicks.com/vendor/kubota
New Holland Parts - http://www.messicks.com/vendor/new-holland
More Articles
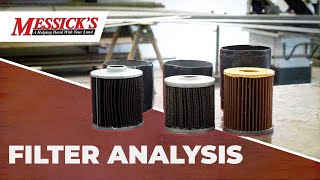
Filter Analysis Cutting into First 50hr Filters Three Minute Thursday
Today, we're going to do a short investigation into the filters that I just took off of my tractor. Just did my 50-hour service. We're going to take the three filters off of my machine, the two hydraulic filters and the engine oil filter, crack them open, and check and see what kind of debris they picked up from the inside of my machine during that break-in service interval. So what this thing is, is basically a gigantic can opener where you can tighten down this little knife that goes around and cuts the side of this thing open. If you remember here back, it's been probably three years ago, I did a series about three or four videos like this, cutting open, both manufacturers OEM filters, and some aftermarkets and tearing them apart and looking at the differences inside. So if you find this video interesting, it's worth going back on our channel and finding some of those older videos, because there's interesting stuff here and the differences in filter construction and that kind of stuff that might surprise you. These OEM filters are often the same price or only marginally more expensive than what an aftermarket is. And often the quality of them is notably better. One thing that I notice when cutting these things is the difference in the can themselves.
These things do hang underneath the tractor. They're quite exposed. And when I was cutting open those cheap aftermarket $5 Walmart filters in particular, I was able to do this in almost two turns without fighting through it. And that's important, right? Because these things are exposed on the side of your tractor and it only takes a stick through a filter or something to lose all the oil and do significant damage to your tractor. So check those videos out. I think they're really cool. Opening up a filter like this really tells you something about the health of your engine. As far as I understand, this is actually common practice on airplanes and stuff. Anytime mechanic is changing a filter on an airplane, right, important piece of machinery, they're usually cutting the filter open in order to get the sense of the inside's health. It's not a regular part of our process.